Today, absolutely all paperwork on LN-MAV was completed. All EAA signatures, all attachments... (maintenance report, POH, maintenance program, test flight program etc..) was finalized and sent off to the norwegian CAA. July is vacation month in Norway, so I'm really hoping that they will be able to process my application for Permit to Fly before July sets in..
As I have not flown taildraggers for a while (just the Cessna "Cardinal" lately...), the guys in the LN-SAI team (another L-4J located at Kjeller airport) let me fly for an hour tonight. We went up the Glomma river low level and watched all the campfires along the waterfront. Its a norwegian tradition to be out all night by the fire tonight as it is the longest day of the year. Kjeller airport closes for operation at 22:00 LT, but you could almost fly until midnight on VFR day...
The skills was still there... I was pretty happy with my flying and the landings. I plan to make another flight just before my first testflight, this time with some more airwork with stalls and slow flight.
Waiting for that permit to fly now.......
Wednesday, June 24, 2015

Friday, June 19, 2015
CAA inspection and first startup!!!
Another great step forward in the "Maverick" project today:
1) Norway CAA inspector carefully inspected all details on the aircraft and paperwork. With only a few minor findings (most of which we already knew) it passed the inspection "with honors".
2) First startup of the engine since it last ran on LN-RAK (also an L-4J) back in 1976.
The Norwegian CAA (like most other CAA's) does not have the best reputation amongst private pilots. But I have to admit that all contact I have had with Norway CAA regarding the LN-MAV project has proven them as professional and extremely helpful! Where else would you experience that a CAA guy called you up because he saw your number on the call log from 2 days ago!!??? And said "what can I do for you?" I really have to give those guys up in Bodø credit for their positive attitude towards this project. Thanks guys!!
Then we filled her up with AVGAS... and (after correcting a small leak - in a FAA PMA part!!..) we took her out for an attempt to start. It took quite a few turns, but I think the primer pump needed quite some squirts before it startet pumping fuel into the carb. I look like an idiot when the damn thing first started - I had spun the prop so many times that it came as a chock!! :-)
We have to do some fine adjustments to the carb - it seems to run too lean on low RPM. However in 1000 - 1500 RPM it ran like a turbo prop! Considerably less vibration with the Hercules wood propeller than what I was used to with a metal prop. I just could not resist making a first taxi test as well. Brakes works just fine (well, just as good as "normal category" Cub brakes anyway) and steering was no problem.
A real highlight, but as Sander put it: rolling her out for the first time display at Kjeller Airshow was even bigger! Lets just hope that the maiden flight will beat that! Now follows more engine runs as well as high speed taxi tests. Then on monday we will send the application for "Permit to fly" and hope that CAA has not closed down for the summer holiday and that someone can give the approval!
1) Norway CAA inspector carefully inspected all details on the aircraft and paperwork. With only a few minor findings (most of which we already knew) it passed the inspection "with honors".
2) First startup of the engine since it last ran on LN-RAK (also an L-4J) back in 1976.
The Norwegian CAA (like most other CAA's) does not have the best reputation amongst private pilots. But I have to admit that all contact I have had with Norway CAA regarding the LN-MAV project has proven them as professional and extremely helpful! Where else would you experience that a CAA guy called you up because he saw your number on the call log from 2 days ago!!??? And said "what can I do for you?" I really have to give those guys up in Bodø credit for their positive attitude towards this project. Thanks guys!!
Then we filled her up with AVGAS... and (after correcting a small leak - in a FAA PMA part!!..) we took her out for an attempt to start. It took quite a few turns, but I think the primer pump needed quite some squirts before it startet pumping fuel into the carb. I look like an idiot when the damn thing first started - I had spun the prop so many times that it came as a chock!! :-)
We have to do some fine adjustments to the carb - it seems to run too lean on low RPM. However in 1000 - 1500 RPM it ran like a turbo prop! Considerably less vibration with the Hercules wood propeller than what I was used to with a metal prop. I just could not resist making a first taxi test as well. Brakes works just fine (well, just as good as "normal category" Cub brakes anyway) and steering was no problem.
A real highlight, but as Sander put it: rolling her out for the first time display at Kjeller Airshow was even bigger! Lets just hope that the maiden flight will beat that! Now follows more engine runs as well as high speed taxi tests. Then on monday we will send the application for "Permit to fly" and hope that CAA has not closed down for the summer holiday and that someone can give the approval!
Tuesday, June 2, 2015
Kjeller Airshow rollout!
For quite a while we have had Kjeller Airshow 31 May as our deadline. We almost made it! At least the plane appeared as ready to fly, though still missing a very few parts here and there.
As a big surprice, my good L-4 friend Bart came up from Germany to help out. Roald Olsen from Fauske came down to paint Martha Vickers on the nose. I must say, even though very busy, those last few days/nights of work was so much fun and rewarding to see the final details falling into place. A big thanks to Sander (as usual!) as well as Roald and Bart. I will never forget this great few days on the final runup towards the "official rollout" at the airshow.
Friday afternoon: Roald and Bart arrives.. Roald starts with his noseart templates after I have sprayed on the oil-spec stencil. BTW, applying some light layer of spray glue when attaching the stencils was a good technique. Bart / Sander continues with all sorts of work, mechanical and stencils, while I cut out the large stencils for the serial number and callsign LN-MAV for the tail. Late night...
Saturday: We all worked like dogs form the morning. Temperatures were too low for paint, had to use the gass heater... There were quite a few visitors at the airport because there was announced an airshow also on saturday, but due to heavy rain and low ceiling, only a few planes flew - off course an L-4 made a spectacular show in those conditions! :-) We decided to work with open hangar doors and I think a lot of people enjoyed watching us put the final touch on the Maverick (or perhaps they just enjoyed roof above their heads in the heavy rain...). Anyway, we set out to finish all our work at 8 PM because then a hangar party was announced at the Tiger Moth hangar. 8:05 we pronounced the aircraft as FINISHED!!!! Then we sat down for a well deserved beer in the Tiger Moth hangar and as we came half way down the first bottle, a P-51 Mustang roared by and flew a "private show" for the few people there. What a rewarding finish!!!
Sunday morning we washed lightly over the surfaces... because some parts were not completely dry due to low temps.. And we rolled out the Maverick and placed her next to a Willies Jeep on the corner of our hangar. A big thanks to Tom Øyvind Hansen for bringing the Willies Jeep and he also came with a gift: a US Army Air Force Navigation folder to carry maps etc. A real vintage looking piece - THANK YOU!! :-)
I will let the picture speak for themselves. We are now basically waiting for a carburator. Then weight and balance and finally all logs to be completed as well as EAA/CAA paperwork. I am hoping for a permit to fly by the end of June.


As a big surprice, my good L-4 friend Bart came up from Germany to help out. Roald Olsen from Fauske came down to paint Martha Vickers on the nose. I must say, even though very busy, those last few days/nights of work was so much fun and rewarding to see the final details falling into place. A big thanks to Sander (as usual!) as well as Roald and Bart. I will never forget this great few days on the final runup towards the "official rollout" at the airshow.
Friday afternoon: Roald and Bart arrives.. Roald starts with his noseart templates after I have sprayed on the oil-spec stencil. BTW, applying some light layer of spray glue when attaching the stencils was a good technique. Bart / Sander continues with all sorts of work, mechanical and stencils, while I cut out the large stencils for the serial number and callsign LN-MAV for the tail. Late night...
Saturday: We all worked like dogs form the morning. Temperatures were too low for paint, had to use the gass heater... There were quite a few visitors at the airport because there was announced an airshow also on saturday, but due to heavy rain and low ceiling, only a few planes flew - off course an L-4 made a spectacular show in those conditions! :-) We decided to work with open hangar doors and I think a lot of people enjoyed watching us put the final touch on the Maverick (or perhaps they just enjoyed roof above their heads in the heavy rain...). Anyway, we set out to finish all our work at 8 PM because then a hangar party was announced at the Tiger Moth hangar. 8:05 we pronounced the aircraft as FINISHED!!!! Then we sat down for a well deserved beer in the Tiger Moth hangar and as we came half way down the first bottle, a P-51 Mustang roared by and flew a "private show" for the few people there. What a rewarding finish!!!
Sunday morning we washed lightly over the surfaces... because some parts were not completely dry due to low temps.. And we rolled out the Maverick and placed her next to a Willies Jeep on the corner of our hangar. A big thanks to Tom Øyvind Hansen for bringing the Willies Jeep and he also came with a gift: a US Army Air Force Navigation folder to carry maps etc. A real vintage looking piece - THANK YOU!! :-)
I will let the picture speak for themselves. We are now basically waiting for a carburator. Then weight and balance and finally all logs to be completed as well as EAA/CAA paperwork. I am hoping for a permit to fly by the end of June.

 |
| Thanks Sander, I would never be able to finish this in time and with such a high standard without your help! |
 |
| Thanks Roald, the specially design on Maverick noseart is really unique. "Maverick" being a unbreaded young cow that cowboys would use their lasso to catch is the theme for the lasso and cowboy-dressed WW2 pinup Martha Vickers. And off course, the origin of "Maverick" reflects the aircraft registration which has been LN-MAV since 1947. |
 |
| In WW2, an L-4 team consisted of a plane, a Willies jeep, a driver, a chef (!), a mechanic and a pilot. |
 |
| New assignment coming up soldier! |

 |
| Mission planning... |
Wednesday, May 13, 2015
Exhaust system done!
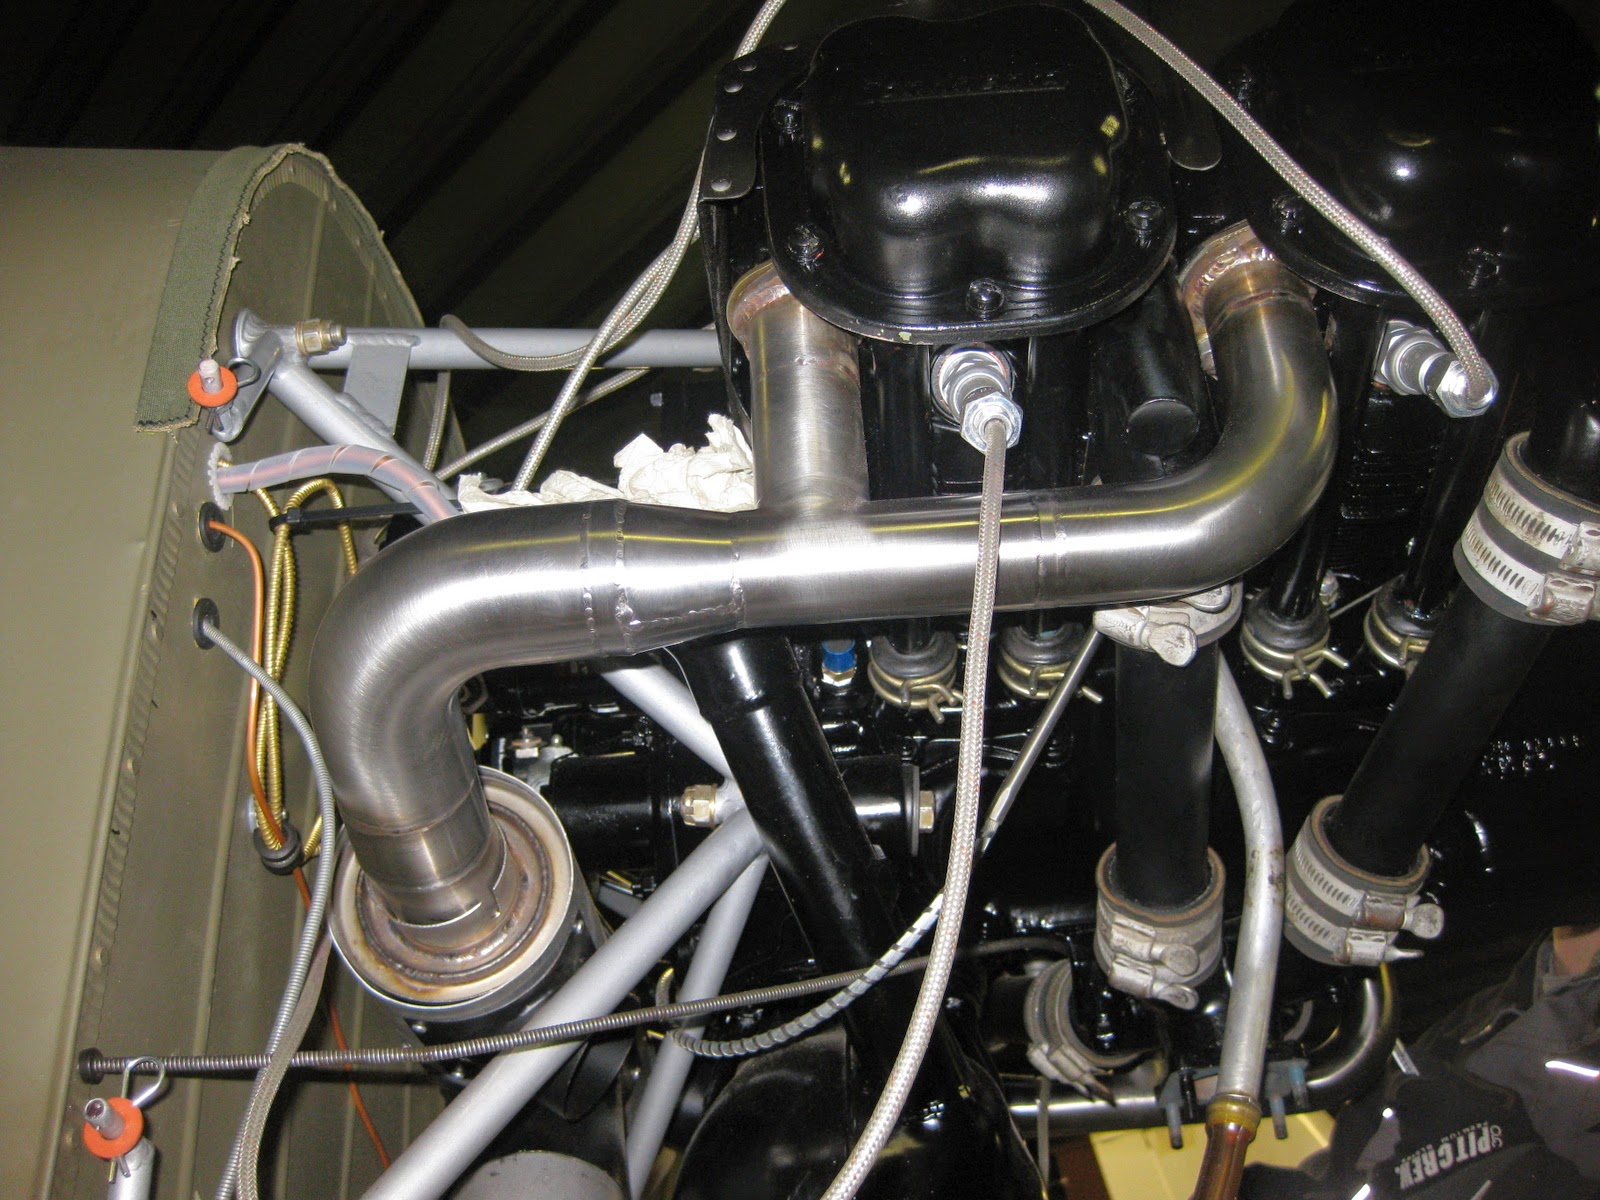
Tonight we finished the exhaust system with the help of Søren, the expert welder from Denmark! It looks great, and I'm sure we now have a more durable exhaust system than the ones available off the shelf. Besides, getting it made on site makes it fit to the cowlings. Great work Søren, thanks very much!
 We also checked the travel on control surfaces. How... ? My brilliant technical chief, Sander, came up with the idea of using a phone inclinometer - they are by far accurate enough and so easy to use!
Cowlings are now in for a final touchup of paint - getting ready for the static display 31st of May.
 Furthermore, continued fitting of the windshield. Have marked the final adjustments to be made and should be able to fix it next time. Small detail: Sander finished the pitot protection in olive drab canvas with a nice and long "Remove before flight" tag. Should be hard to miss on daily inspection...
It's all looking good - and more work to be done in the long weekend coming up. Thursday however, we are flying down to south Sweden to visit the "Cub & Cubs" fly-in, and hopefully spot many nice Cubs and L-4's.


Cowlings are now in for a final touchup of paint - getting ready for the static display 31st of May.
 Furthermore, continued fitting of the windshield. Have marked the final adjustments to be made and should be able to fix it next time. Small detail: Sander finished the pitot protection in olive drab canvas with a nice and long "Remove before flight" tag. Should be hard to miss on daily inspection...
It's all looking good - and more work to be done in the long weekend coming up. Thursday however, we are flying down to south Sweden to visit the "Cub & Cubs" fly-in, and hopefully spot many nice Cubs and L-4's.


Sunday, May 10, 2015
Exhaust-system and more
Today we had Søren visiting us in the hangar. He is a very skilled welder, daily working with highly complex steal/mechanics for off shore use. Søren is now making the exhaust pipes to fit my C90-12F engine, totally different from the 8F engine which was on LN-MAV before. Right side is more or less finished (some fine welding and "polishing" remains). Also notice the black painted cylinder tops. That is correct for the L-4's, even though the chromed ones are cool...
Ailerons cables rigged today. Now MAV has a nice and tight tension with shackle-ends joining the cables. Also, we fine-rigged the tail today.
All in all very happy with the progress. Hope to finish all exhaust system on Tuesday. Windshield up next, and fairings. Working really hard to make the deadline 31 May for the annual airshow at Kjeller Airport. Hopefully also with a CAA inspection following the exhibition after the airshow.


Ailerons cables rigged today. Now MAV has a nice and tight tension with shackle-ends joining the cables. Also, we fine-rigged the tail today.
All in all very happy with the progress. Hope to finish all exhaust system on Tuesday. Windshield up next, and fairings. Working really hard to make the deadline 31 May for the annual airshow at Kjeller Airport. Hopefully also with a CAA inspection following the exhibition after the airshow.


Saturday, May 2, 2015
Ailerons
Hooked on the ailerons using new pins from Univair. Some pulleys are still at the sandblaster, so we did not get it all rigged up. Now I need to find the specifications for how many degrees up/down the ailerons shall have.
Aileron control cables are now attached to the rear control stick and the inside pulley covers are put on. Used a little protective list on the sharp edge to protect the inside ceconite wall.
Also cut hole for the step-mount. However I need to paint the clamp OD before it goes on permanently. I think I might also protect the step with some leather, the paint wears out quickly otherwise.


Wednesday, April 29, 2015
Bit by bit...
Making progress... all those minor things you would not think of... they take time. But it's all coming along really nice now. This will be a good week: our usual Cub building Tuesday night, then the welder will come on Thursday night to hopefully complete exhaust system. Then Friday May 1st is a public holiday = whole day with the Cub! Then we have scheduled rigging Tuesday next week. So this could be the breakthrough we have been waiting for. Perhaps we will finally be ready for some taxing very soon.
Some pictures with comments below.
Some pictures with comments below.
 |
| Even new cowlings from Univair does not necessarily fit well... The top cowling had a gap of almost 2". Should have returned it, but they are probably all made like that.. Talked to someone who had seen it before and recommended to split it in the middle. However we decided to split it on the lower left side to minimize "the impact" and estetics. |
 |
| Hangar neighbour Oddan and my cousin Sander joining the two parts with round-headed rivets. |
 |
| Glued on a protection canvas for the top cowling. Made of solid sail-canvas (double). |
 |
| Impressed by Sander who made the aluminum-piece for the soldering iron which cut perfect holes for the aileron control cable. |
 |
| Mounting the aileron control cables to the control stick. |
 |
| Jury struts installed after receiving the correct ones (for the rear strut) form Univair. |
 |
| Upper half of the door finally attaches to the wing. I wanted a flat-fit there instead of the original mounting on the L-4. |
 |
| By cheating a little and using Cessna flat drain valves, the hole in the door can be made much smaller. |
Monday, April 20, 2015
L-4 stencils
Thanks very much to Tor Nyhus at 335 Squadron of Royal Norwegian Air Force for letting me in to the military paint shop to create all the stencils I needed. Fantastic helpful and friendly guy who has painted many of the great vintage aircraft in Norway, both flying and for museums.
Using the old machines went like a dream, even though they are really old. Some will skip a space and you get two letters on top of each other... but after about an hour I had made them all, except "NO STEP" which will give me a chance to visit the squadron again later...
Meeting people like Tor who wants to help strangers is always great.


Using the old machines went like a dream, even though they are really old. Some will skip a space and you get two letters on top of each other... but after about an hour I had made them all, except "NO STEP" which will give me a chance to visit the squadron again later...
Meeting people like Tor who wants to help strangers is always great.
 |
| Yeah, I have to wear the EXPERIMENTAL tag too... It hurts to put it on, but there is no way around that. At least it helps when it looks "military".. |
Wednesday, April 15, 2015
WINGS ARE ON!!!!!!
What a difference! After almost 3 years I have been restoring an airplane which (most of the time) has looked like a pile of tubes and junk. Tonight the wings came on and it suddenly looks like an aircraft again! And it's so quick too!! 3 people, 8 screwdrivers and 30 minutes! :-) Truly a great moment and a major milestone for the project. Thanks again to my cousin Sander and also to Kåre from Aeromech for great help.
Biggest surprise tonight: a Cub can easily carry only one wing without falling over.
Biggest mistake tonight: turns out we had pulled through the wrong type of control wire. There is one wire going inside the wing, and the other wire going along the wing strut. Neither one matched the original part number, so we had to make an assumption on which to use in the wing. Murphy won again. At first I thought it would be better to take the wings off again, cause pulling those cables through was difficult enough with wings off. But Techinal chief Sander did a great job changing those cables once again. THANKS!! Missing some minor parts (wrong size) like the rear strut clamps (had other Piper ones, probably to later Cub models) which did not fit. Or "fitsn't" as we say.
Next up: exhaust system and upper cowling modifications. Hoping for engine start before the end of April!


Biggest surprise tonight: a Cub can easily carry only one wing without falling over.
Biggest mistake tonight: turns out we had pulled through the wrong type of control wire. There is one wire going inside the wing, and the other wire going along the wing strut. Neither one matched the original part number, so we had to make an assumption on which to use in the wing. Murphy won again. At first I thought it would be better to take the wings off again, cause pulling those cables through was difficult enough with wings off. But Techinal chief Sander did a great job changing those cables once again. THANKS!! Missing some minor parts (wrong size) like the rear strut clamps (had other Piper ones, probably to later Cub models) which did not fit. Or "fitsn't" as we say.
Next up: exhaust system and upper cowling modifications. Hoping for engine start before the end of April!
Tuesday, March 31, 2015
Instrument panel
With the (finally!) correct combination of tachometer cable length and recording/non-recording type, it was time to mount the instrument panel! The panel was one of the first things I bought for this project after obtaining the aircraft itself. I picked up the panel in February 2013 when I was on a business trip to the US. The instruments are restored and yellow tagged by Keystone Instruments in Lock Haven, PA. The panel itself comes form Clyde Smith who has his workshop also by the old Piper factory in Loch Haven.
OK, once again, I must admit that the panel looks stunning. However, I was a little too quick with the research at the time. It turns out that only L-4A and L-4B models were equipped with cream face instruments. The L-4J should have all black instruments with the exception of the Steward Warner oil temp- and pressure gauge. I'm working on gathering all original instruments for a more authentic panel. I have the B-8 air speed, but missing the altimeter for now.
Once again a big thank you to my cousin Sander who has worked hard preparing all connections to the panel: oil lines, primer fuel lines, static and dynamic etc. And most of all his great effort creating a working BATTERY indicator which is very rare in L-4J's today even if most J models had them.


OK, once again, I must admit that the panel looks stunning. However, I was a little too quick with the research at the time. It turns out that only L-4A and L-4B models were equipped with cream face instruments. The L-4J should have all black instruments with the exception of the Steward Warner oil temp- and pressure gauge. I'm working on gathering all original instruments for a more authentic panel. I have the B-8 air speed, but missing the altimeter for now.
Once again a big thank you to my cousin Sander who has worked hard preparing all connections to the panel: oil lines, primer fuel lines, static and dynamic etc. And most of all his great effort creating a working BATTERY indicator which is very rare in L-4J's today even if most J models had them.
Sunday, March 29, 2015
Birdcage (almost) complete!
LN-MAV "Maverick" was a modified L-4, resembling a PA-11. That was very common for the ex-military L-4's that came to Norway as US Army surplus material. It was mainly the birdcage and engine cowlings that was modified, so building a birdcage was a lot of work. However, with strips of 1 mm aluminum and a cheap plate bender tool, we managed to do a great job! Just picked up the strips from etch-priming and OD painting a few days ago. Also, the BC-659 radiobox has undergone sandblasting and repainting. The radio was not painted in the same OD as used on L-4's but a darker and more green variant.
Important to drill the holes in the glass larger to avoid cracks. All screw heads was primed and sprayed OD and locknuts was used, with a red plastic which looks more antique than the blank ones. Underneath the strips we sticked a window-sealant foam in order to keep water out. Don't know how well that will perform, but it looks very good from the inside and it was less "messy" than using silicon/Tec-7 etc.
We decided to split the aftmost windows so they can be taken off in order to access the avionics in the aft fuselage such as ELT and antennas.
The US Airforce Insignia star's are also produced and ready. They are made from high quality film of the same type as used on company-ads on cars etc. However, we need higher temperatures to mount those. We're missing only two cross-strips on top before the entire birdcage is done. A huge step forward.
Next up: waiting for a 30" Recording tachometer cable from Univair. When this arrives we can complete the instrument panel mounting. Then the exhaust pipes will be needed to complete the engine installation and it can be started soon...


Friday, March 13, 2015
Engine and tail installation
The key to progress: 3 days off work and a warm hangar... Took "Maverick" over to my EAA Supervisor hangar at Aeromech. Started by mounting the exhaust system... which turned out to be a waste of time because it was heavily modified and would not fit with my brand new cowls. We're trying to weld new ones that will fit perfect.
Next was mounting the engine which had been assembled by professionals.. It was on LN-RAK (another L-4J) and was blown over by heavy gusts on a frozen lake in 1976.. The engine was disassembled and kept in a box ever since I was 4 years old! Engine mounting was pretty straight forward. Once it was on I just had to test-fit the propeller. It just looks so much more like a plane with the prop ON... Will have to get 3" 31/32 prop bolts (on it's way from aircraft-spruce).
Tail also came on during these days. However, we have not finished control cable attachment quite yet. Since I'm off to a business trip for a week we spent all the time finishing the window strips. They are now in for priming and paint. Things are moving forward!
Next was mounting the engine which had been assembled by professionals.. It was on LN-RAK (another L-4J) and was blown over by heavy gusts on a frozen lake in 1976.. The engine was disassembled and kept in a box ever since I was 4 years old! Engine mounting was pretty straight forward. Once it was on I just had to test-fit the propeller. It just looks so much more like a plane with the prop ON... Will have to get 3" 31/32 prop bolts (on it's way from aircraft-spruce).
Tail also came on during these days. However, we have not finished control cable attachment quite yet. Since I'm off to a business trip for a week we spent all the time finishing the window strips. They are now in for priming and paint. Things are moving forward!
 |
| Testfitting the Hercules wooden propeller, a pretty good replica with great improvements such as carbin leading edge. |
 |
| Tail surface mounted, a challenge to drill the inner cross tube without getting any slack.. |
 |
| Full tail on! Remember to cross the elevator cables.. :-) |
 |
| Back in my own hangar.. happy that the spring seems to be established with temps above 0 most of the time.. |
 |
| Now working on exhaust system which will fit the precut hole in the engine cowl, at the same time as giving room for tach cable and oil temp probe. It's pretty packed in there! |
 |
| Waiting to get back inside. Before first startup we need to finish exhaust system and tachometer cable (needed another angular drive also on the engine side). Then all controls must be attached as well as fuel.. |
Subscribe to:
Posts (Atom)